
Do you want to create a nonprofit donation form right in your WordPress site in a snap? That too without the need for any design skills or developer? Then you need to install and use WPForm‘s PayPal Standard and Stripe Addons on your WordPress site. And WPForms makes it super easy to integrate PayPal and Stripe into your donation form.
Now go through this article to learn how to create nonprofit donation form using WPForms’ PayPal and Stripe Addons. And how to configure the General, Notifications, and Confirmation settings of your nonprofit donation form. And how to add PayPal payments to your donation form. And how to add your final nonprofit donation form to your WordPress site.
Table of Contents
- What are the benefits of having an online donation form on my own WordPress site?
- What is WPForms?
- What is WPForms’ PayPal Addon?
- What is WPForms’ Stripe Addon?
- WPForms discount
- How To Create An Online Donation Form For Nonprofits in WordPress In No Time Using WPForms
- Keep In Touch With Donors
- Final Thoughts On How To Create Online Donation Forms For Nonprofits Right in Your WordPress site Using WPForms
- Create Online Donation Forms For Nonprofits Right In WordPress Using WPForms: FAQs
What are the benefits of having an online donation form on my own WordPress site?
Having an online nonprofit donation form on your own WordPress site has several benefits listed below:
- Gather Whatever Information You Need:
- You can customize your donation form with the required field forms to gather the desired information you need about your site visitors.
- Easy To Donate And Accept:
- Payment solutions like PayPal and Stripe can easily integrate into your WordPress site, so it is easy for your donors to donate. And it also easy for you to accept donation payments.
- Ask Donors To Subscribe Your Email Newsletter:
- You can ask your donors to subscribe to your email newsletter in the same donation form.
- Keep Your Donors On Your Site:
- You can keep your donors on your site for some time for a more professional experience.
What is WPForms?
WPForms is the most powerful, user-friendly, and world’s #1 contact form plugin for WordPress.
More than 3,000,000 smart business owners, designers, professionals, and developers are now using WPForms all over the world.
With its easy and world’s no.01 drag and drop form builder, several pre-built standard and customizable templates, and most popular addons, you can build any form on your WordPress site in just 2 minutes or even less without need for coding skills or even developer.
With WPForms, you can easily and quickly build the following most popular forms:
- Contact Forms
- Payment Forms
- Donation Forms
- Newsletter Forms
- Registration Forms
- Survey Forms
- And more.
Further with WPForms, you can extend the functionalities of your forms by using its most popular addons like:
- PayPal Standard
- Stripe
- Active Campaign
- Constant Contact
- MailChimp
- GetResponse
- Drip
- And more.
What is WPForms’ PayPal Addon?
WPForms’ PayPal Standard addon allows you to integrate your WordPress site with PayPal to easily and quickly:
- Build order forms for the physical products
- Add nonprofit donation form to your WordPress site
- Sell digital downloads
- Collect pre-payments for services
- And more.
What is WPForms’ Stripe Addon?
WPForms’ Stripe addon allows you to integrate your WordPress site with Stripe to easily and quickly collect:
- Payments (One-time and recurring or subscription payments)
- Donations
- Online orders
- And more
WPForms discount
First time customers will get the 50% discount on all WPForms plans through This WPForms discounted pricing page.
- You Might Like: How To Collect PayPal Payments on Your WordPress Site using WPForms
- How To Connect Stripe with Your Payment Form in just 2 Minutes
How To Create An Online Donation Form For Nonprofits in WordPress In No Time Using WPForms
WPForms’s donation form template, easy drag & drop form builder, PayPal Standard, and Stripe Addons make it super easy for you to create nonprofit donation form right on your WordPress site in just a few minutes. And with WPForms’ PayPal and Stripe Addons, you can start collecting nonprofit donations right on your WordPress site.

In this section, you can view the following 9 steps to create an Online Donation Form for Nonprofits right in your WordPress site using WPForms, #1 WordPress Contact Form Plugin.
1. Purchase WPForms Pro Plan or Higher
2. Install and Activate PayPal and Stripe Addons
3. Create a new Nonprofit Donation Form
4. Customize the Form Fields
5. Configure Donation Form’s General Settings
6. Configure Notifications for Your Nonprofit Donation Form To Get and Send Email Notifications
7. Configure Donation Form’s Confirmation
8. Add PayPal Payments or Stripe Payments To Your Donation Form
9. Add Your Nonprofit Donation Form To Your WordPress site
Total Time: 5 minutes
Step1: Purchase WPForms Pro Plan or Higher

1. The foremost step is you need to purchase the WPForms Pro Plan or Higher. Because to create a Donation Form you need PayPal Standard or Stripe addon. Both PayPal Standard and Stripe addons are included in WPForms Pro and Elite plans.
2. The cost of the WPForms Pro plan is $199.50 per year. And at this price, your WordPress site can, not only access PayPal and Stripe addons but also the most popular addons and features of WPForms like Form Landing Pages, Conversational Forms, Surveys and Polls, Form Abandonment, Geolocation, Zapier, Signatures, User Registration, Post Submissions, and more.
3. Next, install and activate WPForms on your WordPress.
4. Suppose you have already installed, go to next step.
Step2: Install and Activate PayPal and Stripe Addons

1. Go to your WordPress site dashboard.
2. Navigate to WPForms >> Addons.
3. Install and activate PayPal Standard and Stripe addons.
4. Once the installation finishes, you can view Status: Active, just below the PayPal Standard and Stripe Addons.
Step3: Create a new Nonprofit Donation Form

1. On your WordPress dashboard, navigate to WPForms >> Add New.
2. Name your form.
3. Hover over the Donation Form template and click the Create a Donation Form.
4. WPForms creates and opens a new donation form. 
Step4: Customize the Form Fields

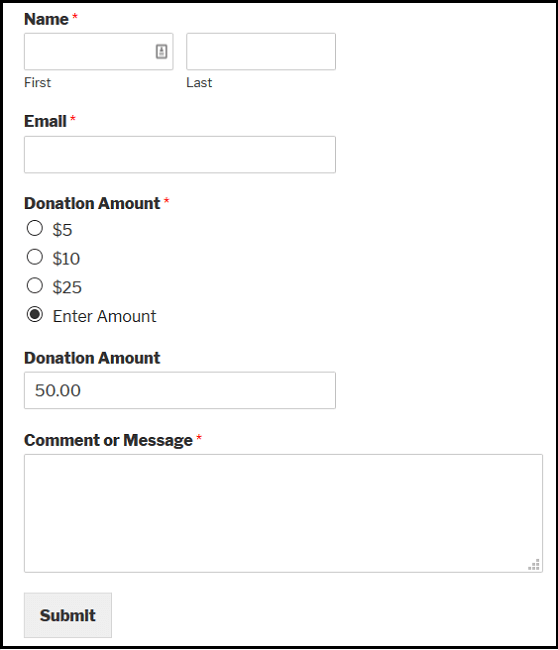
1. By default, your new donation form consists of Name, Email, Donation Amount, and Comment or Message fields.
2. But you can add additional fields simply by dragging the field forms from the left-hand panel to the right-hand panel.
3. Here, the Donation Amount field is a Single Item field where users can type in the desired amount they want to donate. However, you can also add multiple choice or dropdown fields to it.
4. Now let’s see how to add a multiple-choice payment field that consists of several donation amounts, the users have to choose from. And keeping the Enter Amount field, so users can also have the choice to enter the desired amount they want to donate.
5. Drag the Multiple Items form field present under Payment Fields, and drop it above the Donation Amount field, on the right-hand panel.
6. Now, click the Multiple Items form field on the right-hand panel and do the following:
Change the label name as Donation Amount.
Enter your desired amounts in each item.
Add an item and name it as ‘Enter Amount’.
7. Scroll down and click the checkbox of Required to ensure that the users filling your donation form enter the amounts before they click submit.
8. Now you need to customize your donation form to display the Single Item form field Donation Amount, only when the donors select the multiple-choice option Enter Amount.
9. To begin, click the Donation Amount form field.
10. Unclick the checkbox of Required.
11. Scroll down and click Conditionals. And select the checkbox of ‘Enable conditional logic’.
Now, select the option to Show this field if “Donation Amount” is “Enter Amount”.
12. Click the Save button, at the top right.
That’s It! You have now customized the field forms in your donation form.
Step5: Configure Donation Form’s General Settings

You need to configure several settings like General, Notifications, and Confirmation when you are creating a nonprofit donation form in WordPress. Now start with the general settings.
To begin, go to Settings >> General. And configure the following.
Form Name: Change the name of your nonprofit donation form, if you want.
Form Description: Give a description of your donation form.
Submit Button Text: Customize the donation form button copy.
Spam Prevention: Enable the honeypot feature or Google reCAPTCHA to stop contact form spam.
AJAX Forms: Enable this to permit form submission without page reload.
GDPR Enhancements: To comply with GDPR laws, you need to disable the storing of entry information and user details like IP addresses and user agents.
After configuring the general settings of your donation form, click the Save button.
Step6: Configure Notifications for Your Nonprofit Donation Form To Get and Send Email Notifications

1. Notifications are a great way to send an email to your site visitors whenever they make donations on your site. At the same time, you can also receive an email notification.
2. Now to configure Notifications, go to Settings >> Notifications.
3. You can view On under the Notifications section. This means, by default, notifications option is enabled to your donation form. So, you can receive an email notification whenever someone makes a donation on your website.
4. Suppose you use smart tags, you can also send an email notification to your site visitors whenever they make a donation on your website. This ensures your site visitors that their donation forms have reached you.
To set this up, click Show Smart Tags to the right side of Send To Email Address. 
Select the E-mail field. Then a smart tag will automatically be added to the Send To Email Address.
Now, this Smart Tag automatically will pull the email address that your site visitor/user entered in your nonprofit donation form. And acknowledge is sent to this email address.
Besides above, you need to configure simple fields like:
Email Subject, From Name, From Email, Reply-To, and Message.
Step7: Configure Donation Form’s Confirmation

1. Form Confirmations are great ways to express Heartful Messages like ‘Thank You for submitting the nonprofit donation form’ and more to your site visitors/users, immediately, when they make donations on your site.
2. WPForms permits you to choose three different types of confirmations to set up:
Message:
This is a default confirmation type that displays a simple confirmation message like ‘Thank You For Submitting The Form And Your Form is Processed Successfully‘ to your site visitors when they make donations on your site. If you desire, you can customize this confirmation type to boost your site visitors’ satisfaction.
Show Page:
If you choose this confirmation type, it automatically sends your site visitors to any webpage on your site like Thank You page.
Go To URL (Redirect):
Suppose you want to redirect your site visitors to a different website after making donations on your website, you can choose this confirmation type.
3. Now let’s view how to set up a confirmation type for your donation form.
To begin, just go to Settings >> Confirmation.
Next, select any confirmation type like Message, Show Page, and Go To URL (Redirect). Then customize the confirmation type that you have chosen. And click on Save.
Step8: Add PayPal Payments or Stripe Payments To Your Donation Form

1. Now you have created your nonprofit donation form. And you have configured General, Notifications, and Confirmation settings of your nonprofit donation form.
2. The next step is you need to add PayPal or Stripe Payments to your nonprofit donation form. Here, you can view how to add PayPal Payments to your donation form.
3. To add PayPal Payments, edit your donation form and go to Payments >> PayPal Standard.
Click the checkbox of Enable PayPal Standard payments.
4. Now you need to configure the following fields:
PayPal Email Address: Type in here the email address associated with your PayPal account.
Mode: Choose Production Mode.
Payment Type: Choose Payment Type as Donation.
Cancel URL: Type in the URL to send your site visitors/users to when they don’t complete PayPal checkout.
Shipping: Choose one of the options,
Don’t ask for an address,
Ask for an address, but do not require it, or
Ask for an address and require it.
Next, you can see two checkbox options, at the bottom of these options.
Don’t ask the buyer to include a note with payment: Unselect this box, if you want to permit users to add a note in the PayPal checkout.
Enable conditional logic: Select this box, if you want to set up conditional logic. But in most cases, you don’t need conditional for donation forms. So, unselect this checkbox.
When you are ready, click the Save button.
That’s it!
You have now added the PayPal Payment to your nonprofit donation form.
Now whenever users submit this donation form on your WordPress site, then they will be taken to the PayPal website to complete the payment process.
Step9: Add Your Nonprofit Donation Form to your WordPress site
The final step is you need to add your final nonprofit donation form to your WordPress website.
With WPForms, you can add your forms to several locations on your WordPress site including your blog pages, posts, and even sidebar widgets.
For example, create a new page or post in your WordPress site and click on the Add Form button.
Choose your nonprofit donation form from the dropdown field. And click on the Add Form button.
Finally, click on the Publish button to publish your page or post. Then your nonprofit donation form appears on your WordPress site.
Keep In Touch With Donors
WPForms permits you to combine your donation form with the most popular email marketing services such as:
- MailChimp
- Constant Contact
- AWeber
- GetResponse
- Drip
- Campaign Monitor
This is a great way to add donors to your email list. And keep them know about your organization’s events.
Final Thoughts On How To Create Online Donation Forms For Nonprofits Right in Your WordPress site Using WPForms
You are now able to create an online nonprofit donation form right in your WordPress site using WPForms PayPal and Stripe Addons. And WPForms’ pre-built donation form template, easy drag & drop form builder, PayPal Standard, and Stripe add-ons make it super easy for you to create an online nonprofit donation form in less than 2 minutes. That too without the need for any design skills or developer.
Its time to express thanks to WPForms for making the complex task of creating nonprofit donation form right in your WordPress site easy and quick.
- Read Next: How To Create An Order form in WordPress With or Without Payment Option
- How to Easily Create a File Upload Form in WordPress Using WPForms
I confirm that this article How To Create Online Donation Forms For Nonprofits Right in WordPress In A Snap Using WPForms is a quick guide for you to learn how to easily and quickly create nonprofit donation form right on your WordPress site using WPForms’ PayPal and Stripe addons. If you like this article, do a favor by sharing this article and follow BlogVwant on Facebook and Twitter for more tips.
Create Online Donation Forms For Nonprofits Right In WordPress Using WPForms: FAQs
How do I accept donations on WordPress?
WPForms’ PayPal and Stripe Addons easily integrates into your donation form and permit you to accept donations on your WordPress site.
Can you use PayPal for donations?
Yes.
What happens when a PayPal payment form is submitted?
Whenever someone submits PayPal payment forms on your WordPress site, they will be taken to the PayPal website to finish the payment process.
How do I know when the user completes their payment on PayPal’s site?

You can see the status of payments of PayPal payment forms right on your WordPress site dashboard.
Now to view, go to your WordPress dashboard and navigate to WPForrms >> Entries.
Then you can view the Entries page that displays the status of PayPal Payments.
Here the Entries page shows a Pending status for entries until your users finish the PayPal payments.
Once the users finish the payments, the Pending status changes to read Completed.
How do I test PayPal payments in my forms?
The easiest way to test out your PayPal forms is to submit an entry. Then follow the similar steps as your users.
To do this task, you have to set up PayPal’s Test Mode, before you add your form to a live page. This lets you test transactions before accepting actual payments.
Is WPForms partnered with Stripe?
Yes. And as a Stripe partner, WPForms uses Stripe’s best practices to make sure your payments are consistently safe and secure.
How do I test Stripe payments in my forms?
The easiest way to test out your Stripe forms is to submit an entry. Then follow the similar steps as your users.
To do this task, you have to set up Stripe’s Test Mode, before you add your form to a live page. This lets you test transactions before accepting actual payments.
Can I use Stripe for donations?
Yes.
Comments Rating 0
(0 reviews)
Support Us By Sharing this Post:
- Click to share on Facebook (Opens in new window)
- Click to share on Twitter (Opens in new window)
- Click to share on WhatsApp (Opens in new window)
Related
,